How To Install Wireless Security Camera System At Home
Installing a wireless security camera system at home offers peace of mind and enhanced property protection. This comprehensive guide will walk you through every step, from planning and choosing the right equipment to the actual installation and setup, ensuring your home is secured effectively and efficiently.
Planning Your Wireless Security Camera System
Before diving into the technical aspects of installing a wireless security camera system, thorough planning is paramount. This initial phase sets the foundation for a robust and effective surveillance setup, ensuring you cover all critical areas of your property without unnecessary expenditure or blind spots. In 2025, the market for home security systems continues to grow, with an estimated 35% of households utilizing some form of smart home security, including wireless cameras. This trend highlights the increasing demand for accessible and user-friendly security solutions.
Assessing Your Security Needs
The first step in planning is to conduct a comprehensive assessment of your home's security vulnerabilities and your specific needs. Walk around your property, both inside and out, and identify potential entry points, high-traffic areas, and valuable assets you wish to monitor. Consider:
- Entry Points: Front door, back door, garage door, ground-floor windows.
- Vulnerable Areas: Driveways, side yards, secluded patios, areas with poor lighting.
- High-Value Areas: Home office, living room where valuables might be, storage areas.
- Blind Spots: Areas not visible from existing windows or doors.
- Specific Concerns: Package theft, monitoring children or pets, deterring potential intruders.
By understanding these points, you can determine the optimal number and placement of cameras needed to achieve comprehensive coverage. For instance, a home with a long, dark driveway might require a camera with excellent night vision and motion detection capabilities positioned to cover that specific area.
Determining Camera Placement
Strategic camera placement is crucial for maximizing effectiveness and deterring crime. Generally, cameras should be mounted high enough to be out of reach but low enough to capture clear facial features if necessary. Avoid pointing cameras directly at bright lights, which can wash out the image, and be mindful of privacy regulations and your neighbors' property.
Outdoor Camera Placement Considerations
For outdoor installations, consider:
- Entrances: Mount cameras near all main entry points (front door, back door, garage).
- Driveway and Sidewalks: Position cameras to monitor approaches to your home.
- Perimeter: Cover the entire perimeter of your property to detect any unauthorized access.
- Elevation: Mount cameras at least 8-10 feet high to prevent tampering.
- Weather Protection: Ensure cameras are rated for outdoor use and consider mounting them under eaves for added protection from rain and direct sun.
Indoor Camera Placement Considerations
For indoor installations, focus on:
- Main Living Areas: Living room, family room, kitchen.
- Entryways: Hallways leading from doors.
- High-Value Areas: Home office, rooms with safes or expensive electronics.
- Pet/Child Monitoring: Areas where children or pets spend most of their time.
- Privacy: Avoid placing cameras in bedrooms or bathrooms.
Understanding Wireless Connectivity
Wireless security cameras rely on Wi-Fi networks for transmitting data. Therefore, understanding your home's Wi-Fi signal strength and coverage is essential. Weak Wi-Fi signals can lead to dropped connections, laggy video feeds, and unreliable performance. In 2025, most modern wireless cameras utilize the 2.4GHz band, which offers a wider range but can be more susceptible to interference. Some higher-end models also support the 5GHz band, providing faster speeds but with a shorter range.
Before purchasing, perform a Wi-Fi speed test in the intended camera locations. If you have dead zones or weak signals, consider investing in a Wi-Fi extender or a mesh Wi-Fi system. A mesh system, in particular, is highly recommended for larger homes or those with multiple floors, as it creates a unified network with seamless coverage throughout the entire property.
Budgeting for Your System
Wireless security camera systems vary significantly in price, depending on features, brand, and the number of cameras. Establish a realistic budget early in the planning process. Consider not only the initial hardware cost but also potential ongoing expenses such as cloud storage subscriptions for recorded footage, battery replacements (for battery-powered cameras), or professional installation if you opt for it. In 2025, basic DIY wireless camera kits can range from $150 to $500, while more advanced systems with multiple cameras, higher resolution, and advanced features can cost upwards of $1000 or more. Cloud storage plans typically range from $5 to $30 per month per system.
Choosing the Right Wireless Security Camera Equipment
With your plan in place, it's time to select the right equipment. The market offers a vast array of wireless security cameras, each with different features and capabilities. Understanding these options will help you make an informed decision that aligns with your needs and budget. By 2025, advancements in AI-powered analytics, battery life, and video resolution have become standard features in many mid-range and high-end models.
Types of Wireless Security Cameras
Wireless security cameras can be broadly categorized based on their power source and connectivity:
- Wi-Fi Cameras: These are the most common type. They connect to your home's Wi-Fi network to transmit video feeds and receive commands. They typically require a power outlet.
- Battery-Powered Wi-Fi Cameras: These offer greater flexibility in placement as they don't require a nearby power outlet. However, they necessitate periodic battery recharging or replacement. Battery life can range from a few weeks to several months, depending on usage and settings.
- Solar-Powered Wi-Fi Cameras: These are battery-powered cameras that come with a solar panel to continuously recharge the battery, offering a virtually maintenance-free solution for outdoor use.
Key Features to Consider
When evaluating different camera models, pay close attention to the following features:
Video Resolution
Resolution determines the clarity of the video feed. Higher resolutions (e.g., 1080p, 2K, 4K) provide sharper images, making it easier to identify details like faces and license plates. For most home security purposes, 1080p (Full HD) is a good starting point, offering a balance of quality and bandwidth usage. 2K and 4K offer superior detail but require more bandwidth and storage.
Field of View (FOV)
The FOV indicates how wide an area the camera can capture. A wider FOV (e.g., 130-150 degrees) is ideal for monitoring large spaces or entryways, while a narrower FOV might be suitable for specific, focused monitoring. Some cameras offer pan-and-tilt capabilities, allowing you to remotely adjust the camera's view.
Night Vision
Essential for round-the-clock surveillance, night vision uses infrared (IR) LEDs to illuminate the scene in low-light conditions. Look for cameras with good IR range (measured in feet or meters) and clear black-and-white imagery at night. Color night vision technology is also becoming more prevalent, offering more detailed color images in low light.
Motion Detection and Alerts
Most wireless cameras feature motion detection, which triggers recording and sends alerts to your smartphone when movement is detected. Advanced models offer customizable motion zones, person detection, package detection, and even facial recognition to reduce false alarms and provide more relevant notifications. By 2025, AI-powered object detection is a standard feature in most reputable systems.
Two-Way Audio
This feature allows you to hear audio from the camera's location and speak through the camera's built-in speaker. It's useful for communicating with visitors, deterring intruders, or checking in on pets.
Storage Options
Recorded footage can be stored locally on a microSD card or an NVR (Network Video Recorder), or in the cloud. Cloud storage offers convenience and off-site backup but typically requires a monthly subscription. Local storage is a one-time purchase but can be vulnerable to theft or damage if the device is compromised.
Weather Resistance
For outdoor cameras, ensure they have an IP rating (e.g., IP65, IP66, IP67) indicating their resistance to dust and water. This is crucial for durability in various weather conditions.
Smart Home Integration
Consider cameras that integrate with popular smart home platforms like Amazon Alexa, Google Assistant, or Apple HomeKit for voice control and automation with other smart devices.
Popular Wireless Security Camera Brands (2025 Overview)
The market is dominated by several key players, each offering a range of products:
| Brand | Key Strengths | Typical Price Range (DIY Kit) | Considerations |
|---|---|---|---|
| Arlo | Excellent video quality, weather resistance, wire-free options, strong app. | $300 - $800+ | Cloud storage subscription often necessary for full features. |
| Ring | Affordable, easy setup, strong integration with other Ring devices, good motion detection. | $100 - $400+ | Video quality can be slightly lower than premium brands. |
| Google Nest Cam | Sleek design, intelligent alerts, seamless Google Home integration, good battery life (for wire-free models). | $100 - $300+ | Cloud storage required for full functionality. |
| Eufy | No monthly fees for local storage (via HomeBase), good video quality, battery-powered options. | $150 - $500+ | Setup can be slightly more involved than some competitors. |
| Wyze | Extremely affordable, decent features for the price, good for basic monitoring. | $30 - $100+ | Build quality and advanced features are limited compared to premium brands. |
When choosing, consider purchasing a starter kit that includes a base station or hub and a few cameras. You can always expand your system later if needed. Read recent reviews (2025) for specific models to gauge real-world performance and reliability.
Step-by-Step Installation Guide
Installing a wireless security camera system is generally a DIY-friendly process, especially with modern plug-and-play devices. This guide will take you through the essential steps, ensuring a smooth and successful installation. By following these instructions, you can have your system up and running in a few hours.
Gathering Your Tools and Materials
Before you begin, ensure you have all the necessary tools and materials. This will save you time and frustration during the installation process.
- Your chosen wireless security camera system (cameras, base station/hub if applicable)
- Smartphone or tablet with the manufacturer's app installed
- Wi-Fi network name (SSID) and password
- Drill and appropriate drill bits (for mounting screws)
- Screwdriver set
- Ladder (for high mounting locations)
- Pencil or marker
- Level
- Safety glasses
- Optional: Cable clips or ties (for managing wires if applicable, though less common for true wireless)
- Optional: Caulk or sealant (for outdoor mounts to prevent water ingress)
Step 1: Charge or Power Up Cameras
If your cameras are battery-powered, ensure they are fully charged before installation. For cameras that plug into an outlet, position them near a power source. If you need to extend power, use an outdoor-rated extension cord and ensure it is properly protected from the elements.
Step 2: Install the Base Station/Hub (If Applicable)
Many wireless systems use a base station or hub that connects to your router via an Ethernet cable. This hub acts as the central point for your cameras. Follow the manufacturer's instructions to connect the hub to your router and power it on. Typically, this involves plugging the hub into your router using the provided Ethernet cable and then plugging the hub into a power outlet.
Step 3: Download and Install the Mobile App
Most wireless camera systems are managed through a dedicated mobile app. Download the app from your device's app store (iOS or Android) and create an account. This app will be used for setup, viewing live feeds, accessing recordings, and configuring settings.
Step 4: Connect Cameras to Your Wi-Fi Network
This is the core of the wireless setup. The process varies slightly by brand, but generally involves:
- Initiate Pairing: Open the mobile app and select the option to add a new device or camera.
- Power On Camera: Follow the app's instructions to power on your camera. Many cameras will emit a sound or have an indicator light to signal they are ready for pairing.
- Scan QR Code or Enter Code: The app may prompt you to scan a QR code located on the camera or its packaging, or to manually enter a device code.
- Connect to Wi-Fi: The app will guide you through connecting the camera to your home Wi-Fi network. You'll need to select your network name (SSID) and enter your Wi-Fi password. Ensure you are connecting to a 2.4GHz network if your camera only supports that band.
- Confirmation: Once connected, the app will confirm that the camera has been successfully added to your system.
Tip: For initial setup, it's often easiest to bring the camera close to your Wi-Fi router to ensure a strong connection before moving it to its permanent location.
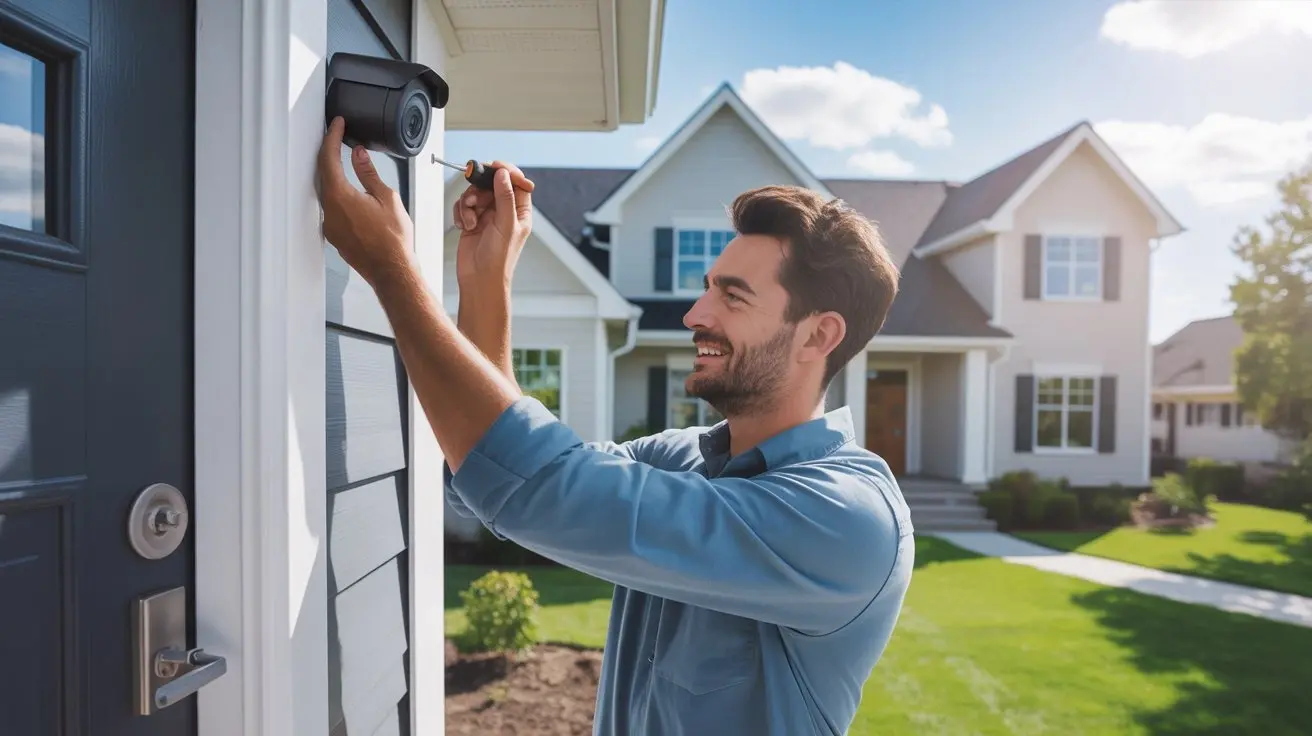
Step 5: Mount the Cameras
Now it's time to physically install the cameras in their chosen locations. This step requires careful execution to ensure optimal viewing angles and secure mounting.
Outdoor Mounting
- Mark Mounting Position: Hold the mounting bracket against the wall or surface where you want to install the camera. Use a pencil to mark the screw holes.
- Drill Pilot Holes: If mounting on wood, you might be able to screw directly in. For harder surfaces like brick or stucco, use a drill with an appropriate masonry bit to create pilot holes. If using wall anchors, drill holes large enough for the anchors.
- Attach Mounting Bracket: Secure the mounting bracket to the wall using the provided screws. If mounting outdoors, consider using outdoor-rated screws and sealant around the bracket to prevent water damage.
- Attach Camera: Connect the camera to the mounting bracket. Many cameras have a magnetic mount or a screw-in mechanism. Adjust the camera's position to achieve the desired viewing angle.
- Weather Protection: If your camera is not inherently weather-resistant or is mounted in an exposed area, consider adding a protective housing or mounting it under an overhang.
Indoor Mounting
Indoor mounting is generally simpler. Follow similar steps as outdoor mounting, ensuring the camera is placed at an optimal height and angle for surveillance. For cameras that plug into an outlet, ensure the power cord is neatly managed and not a tripping hazard.
Step 6: Test Camera Functionality
Once all cameras are mounted and powered on, it's crucial to test their functionality. Use the mobile app to:
- View the live feed from each camera.
- Check the video quality and adjust the camera angle if needed.
- Test motion detection by walking in front of each camera and verifying that you receive an alert on your phone.
- Test two-way audio if your cameras have this feature.
- Check night vision by turning off the lights in the room or waiting until dark.
If a camera isn't working correctly, recheck its power connection, Wi-Fi connection, and ensure it's properly paired within the app. Refer to the troubleshooting section if issues persist.
Setting Up and Configuring Your System
With the hardware installed, the next crucial phase is configuring your wireless security camera system through its software interface. This involves fine-tuning settings to optimize performance, minimize false alarms, and ensure you receive timely notifications. In 2025, advanced AI features in these apps allow for highly personalized security profiles.
Navigating the Mobile App/Web Interface
The mobile app is your primary control center. Familiarize yourself with its layout:
- Dashboard: Provides an overview of all connected cameras and their status.
- Live View: Allows you to watch real-time footage from any camera.
- Event Timeline/Recordings: Accesses recorded footage triggered by motion or scheduled recordings.
- Settings: This is where you'll customize individual camera and system-wide preferences.
- Notifications: Manage how and when you receive alerts.
Configuring Motion Detection and Alerts
This is one of the most important settings to get right to avoid notification overload.
Motion Zones
Most systems allow you to define specific "motion zones" within the camera's field of view. By drawing these zones on the screen, you can instruct the camera to only detect motion within those areas. For example, if a camera overlooks your driveway and a sidewalk, you might create a motion zone that covers only the driveway to avoid alerts from people walking on the sidewalk.
Sensitivity Levels
Adjust the motion detection sensitivity. A high sensitivity will trigger alerts for even minor movements (like leaves blowing), while a low sensitivity might miss actual events. Experiment to find the optimal balance for your environment. Factors like trees swaying in the wind or passing traffic can influence this setting.
Smart Alerts (Person, Package, Animal Detection)
Leverage AI-powered smart alerts if your system offers them. These features differentiate between people, vehicles, animals, and general motion, allowing you to receive more relevant notifications. For instance, you can choose to only be alerted when a person is detected, ignoring passing cars or pets.
Notification Frequency and Schedules
Configure how often you receive alerts. Some apps allow you to set schedules for when you want to receive notifications (e.g., only when you're away from home) or to set "quiet hours" to avoid disturbances.
Setting Up Recording Schedules and Options
Determine how you want your cameras to record footage.
- Continuous Recording: Some systems offer continuous 24/7 recording, but this requires significant storage space and bandwidth.
- Motion-Triggered Recording: This is the most common and efficient method, where recording only starts when motion is detected.
- Scheduled Recording: You can set specific times for recording, though this is less common for general security.
Configure the duration of recordings (e.g., 30 seconds, 1 minute) and the quality settings. Higher quality means better detail but uses more storage.
Optimizing Video Quality
While high resolution is important, consider your internet bandwidth. If you experience buffering or lag, you might need to reduce the video resolution or frame rate. Ensure your Wi-Fi network is stable and has sufficient upload speed, especially if you're using cloud storage. A minimum upload speed of 1-2 Mbps per camera is generally recommended for 1080p streaming.
Managing Storage
If you're using cloud storage, select a plan that suits your needs based on the number of cameras and how long you want to retain recordings. For local storage (microSD card or NVR), ensure the storage capacity is sufficient. Most systems support loop recording, where new footage overwrites the oldest footage when the storage is full.
User Access and Permissions
If other family members need access to the system, most apps allow you to invite them and assign different permission levels (e.g., view only, full control). This is crucial for shared households.
Firmware Updates
Manufacturers regularly release firmware updates to improve performance, add new features, and patch security vulnerabilities. Ensure your system is set to automatically update or manually check for updates periodically. Keeping your firmware up-to-date is critical for maintaining the security and functionality of your system.
Maintenance and Troubleshooting
To ensure your wireless security camera system operates reliably over time, regular maintenance and knowing how to troubleshoot common issues are essential. Proactive care can prevent many problems before they arise. By 2025, most systems offer robust self-diagnostic tools within their apps.
Routine Maintenance Tasks
Performing these simple tasks will keep your system in optimal condition:
- Clean Camera Lenses: Dust, dirt, and water spots can obscure the camera's view. Periodically wipe the lenses with a soft, lint-free cloth. For outdoor cameras, a gentle spray of water can help remove stubborn grime, but avoid abrasive cleaners.
- Check Battery Levels: For battery-powered cameras, monitor battery levels through the app and recharge or replace batteries as needed. Consider having spare batteries on hand.
- Inspect Wiring and Mounts: Ensure all cables are securely connected and not damaged. Check that camera mounts are still firm and haven't loosened due to weather or vibrations.
- Verify Wi-Fi Connectivity: Occasionally check that all cameras are connected to your Wi-Fi network. A quick glance at the app's status indicators is usually sufficient.
- Update Firmware: As mentioned, keep firmware updated for security and performance improvements.
- Test Functionality: Every few months, perform a quick test of motion detection, live view, and recording to ensure everything is working as expected.
Common Troubleshooting Scenarios
Here are solutions to some of the most frequent problems users encounter:
Camera Offline/Not Connecting
- Check Power: Ensure the camera is powered on and the power source is working.
- Check Wi-Fi Signal: Verify that the camera is within range of your Wi-Fi router and that the signal is strong. Move the camera closer to the router or consider a Wi-Fi extender.
- Restart Router and Camera: Power cycle your Wi-Fi router and the camera. Wait a minute or two before turning them back on.
- Re-enter Wi-Fi Credentials: Sometimes, Wi-Fi passwords can change. Try re-entering your Wi-Fi password in the camera's settings via the app.
- Check for Interference: Other electronic devices (microwaves, cordless phones) can interfere with Wi-Fi signals. Try to move the camera or the interfering device.
Poor Video Quality (Blurry, Laggy, Pixelated)
- Check Internet Speed: Your internet connection might be the bottleneck. Run a speed test to ensure sufficient upload bandwidth.
- Reduce Resolution: Lower the video resolution in the camera's settings if your internet speed is insufficient.
- Check Wi-Fi Signal Strength: A weak Wi-Fi signal can degrade video quality.
- Clean Lens: A dirty lens is a common cause of blurriness.
False Motion Alerts
- Adjust Motion Zones: Refine your motion zones to exclude areas where frequent false triggers occur (e.g., busy streets, trees swaying).
- Lower Sensitivity: Reduce the motion detection sensitivity.
- Enable Smart Alerts: Utilize person detection or other AI-based filtering if available.
- Check for Environmental Factors: Consider lighting changes, shadows, or reflections that might be triggering the sensor.
No Audio or Poor Audio Quality
- Check Microphone/Speaker: Ensure the microphone and speaker on the camera are not obstructed.
- Check App Settings: Verify that audio is enabled in the camera's settings within the app.
- Restart Camera: Sometimes a simple restart can resolve audio glitches.
Battery Draining Too Quickly (for Battery-Powered Cameras)
- Check Motion Detection Settings: Frequent motion events will drain the battery faster. Optimize motion zones and sensitivity.
- Reduce Recording Length: Shorter recordings use less power.
- Disable Unnecessary Features: Turn off features like continuous recording if not needed.
- Check for Firmware Issues: Ensure the camera has the latest firmware, as updates can sometimes improve battery efficiency.
- Extreme Temperatures: Very cold or very hot temperatures can affect battery performance.
When to Contact Support
If you've tried the troubleshooting steps and are still experiencing issues, it's time to contact the manufacturer's customer support. They can provide more specific guidance, diagnose hardware failures, or arrange for replacements under warranty. Keep your purchase receipt and model number handy when you contact them.
In conclusion, installing a wireless security camera system at home is an achievable project that significantly enhances your property's safety and your peace of mind. By carefully planning your camera placements, selecting the right equipment with features like high resolution and robust night vision, and following a methodical installation process, you can create a robust surveillance network. The configuration phase is critical for tailoring the system to your specific needs, especially regarding motion detection and alerts. Regular maintenance and understanding how to troubleshoot common issues will ensure your system remains effective and reliable for years to come. With the right setup, you'll have a vigilant digital guardian watching over your home, providing valuable insights and deterrence against potential threats.