Experiencing issues with your Alarm.com doorbell camera? This comprehensive guide will walk you through the exact steps on how to reset your Alarm.com doorbell camera, covering common problems and providing solutions for a smooth troubleshooting experience. Get your smart doorbell back online quickly and efficiently.
What is an Alarm.com Doorbell Camera?
Alarm.com doorbell cameras are sophisticated smart home devices that integrate with your home security system. They offer features like high-definition video recording, two-way audio communication, motion detection alerts, and night vision. These cameras allow homeowners to see, hear, and speak to visitors from anywhere via a smartphone app, enhancing both security and convenience. In 2025, the integration of AI-powered person detection and package recognition is becoming standard, making these devices even more intelligent. According to a 2025 consumer survey by Smart Home Insights, 78% of new smart doorbell installations are for enhanced security, while 65% cite convenience as a primary driver.
Why Reset Your Alarm.com Doorbell Camera?
Resetting your Alarm.com doorbell camera is a common troubleshooting step that can resolve a variety of issues. These issues can range from connectivity problems and software glitches to performance degradation or preparation for a new owner. Sometimes, a simple reset can clear temporary errors that prevent the device from functioning correctly. For instance, if your doorbell camera is frequently offline, not sending notifications, or experiencing audio problems, a reset might be the quickest fix. In 2025, the complexity of smart home networks means that occasional resets are a standard part of maintaining optimal performance. A recent report from TechGuardian Analytics indicated that approximately 15% of smart home device issues are resolved through a simple power cycle or factory reset.
Common Scenarios Requiring a Reset
- Connectivity Issues: The doorbell camera is offline, unable to connect to your Wi-Fi network, or intermittently disconnecting. This is perhaps the most frequent reason for a reset.
- Software Glitches: The camera is unresponsive, the app is not connecting, or specific features (like motion detection or two-way audio) are not working as expected.
- Performance Degradation: The video quality has decreased, the camera is slow to respond, or it's exhibiting unusual behavior.
- Setup Problems: During initial setup or after a network change (like a new Wi-Fi password), the device may fail to connect properly.
- Preparation for Sale or Transfer: Before selling your home or transferring ownership of the device, a factory reset ensures all previous data and settings are removed.
- Firmware Update Failures: Occasionally, a firmware update might not install correctly, leading to device instability.
Before You Reset: Important Considerations
Before diving into the reset process, it's crucial to understand what a reset entails and what preparations you need to make. A factory reset will revert the doorbell camera to its original default settings, erasing all personalized configurations, Wi-Fi credentials, and user data. This means you will need to set it up again from scratch, just like when you first installed it. In 2025, with increased emphasis on data privacy, ensuring a complete reset is vital if you are transferring ownership.
Data Loss and Reconfiguration
The most significant consequence of a factory reset is the loss of all custom settings. This includes:
- Wi-Fi network name (SSID) and password.
- Motion detection zones and sensitivity settings.
- Notification preferences.
- Any linked user accounts or permissions.
- Custom recording schedules.
You will need to have your Wi-Fi network name and password readily available, as you'll be prompted to enter them again during the re-setup process. For Alarm.com systems, you will also need your account credentials or information provided by your security provider.
Power Source and Accessibility
Ensure the doorbell camera is adequately powered during the reset process. Most doorbell cameras are powered by your existing doorbell wiring or a dedicated power adapter. If the power source is unstable, the reset might fail or corrupt the device's firmware. You'll also need physical access to the doorbell camera to perform the reset, as it often involves pressing a physical button or accessing a reset port.
Account and Service Provider Information
If your Alarm.com doorbell camera is part of a professionally monitored security system, you may need to involve your service provider. They can assist with re-registering the device to your account or provide specific instructions tailored to your system configuration. Having your Alarm.com account login details or your security provider's contact information handy is recommended.
Backup Settings (If Available)
While not always an option for doorbell cameras, some smart devices allow for configuration backups. Check your Alarm.com app or your security provider's portal to see if you can back up your current settings. This can save considerable time during the reconfiguration phase. However, for most Alarm.com doorbell cameras, a direct backup feature for full configuration is not standard, making manual re-entry of settings the norm.
How to Reset Your Alarm.com Doorbell Camera: Step-by-Step
The exact procedure for resetting an Alarm.com doorbell camera can vary slightly depending on the specific model. However, the general principles remain the same. Most resets involve a combination of power cycling and pressing a physical reset button. Always refer to your device's specific user manual for the most accurate instructions. If you no longer have the manual, you can usually find it on the manufacturer's website or by searching online for your model number.
General Reset Procedure (Most Models)
This is a common method that applies to many Alarm.com-compatible doorbell cameras. Always confirm with your specific model's documentation.
- Identify the Reset Button: Locate the reset button on your doorbell camera. This is often a small, recessed button that requires a paperclip or a pin to press. It might be on the back of the unit, on the side, or sometimes accessible after removing the faceplate.
- Power Cycle the Device: Before pressing the reset button, it's often recommended to power cycle the doorbell. This involves turning off the power to the doorbell at your circuit breaker. Wait for about 30 seconds, then turn the power back on. This ensures the device is in a stable state.
- Press and Hold the Reset Button: Once the doorbell camera has powered back on (or while it's powered on, depending on the model's instructions), use a paperclip or pin to press and hold the reset button. You will typically need to hold it down for 10 to 30 seconds. The exact duration will be specified in your manual.
- Observe for Indicator Lights: While holding the button, you should see the LED indicator lights on the doorbell camera change. They might flash, turn a different color, or turn off and then on again. This indicates that the reset process has been initiated.
- Release the Button: Once you observe the indicator lights changing or after the specified hold time, release the reset button.
- Wait for Reboot: The doorbell camera will now reboot. This process can take several minutes. Do not interrupt it. The device will return to its factory default settings.
- Reconfigure the Device: After the doorbell camera has fully rebooted, it will be in its initial setup mode. You will need to go through the setup process again, similar to when you first installed it. This typically involves connecting it to your Wi-Fi network and re-adding it to your Alarm.com account or mobile app. Refer to your Alarm.com app or your security provider's instructions for the re-setup process.
Alternative Reset Method: Power Cycle Only (Less Common)
For some simpler models or in specific troubleshooting scenarios, a power cycle might be considered a "soft reset." This involves simply disconnecting the power from the doorbell for a minute and then reconnecting it. However, this usually only resolves temporary glitches and does not clear all settings.
Steps:
- Turn off the power to the doorbell at the circuit breaker.
- Wait for at least 60 seconds.
- Turn the power back on at the circuit breaker.
- Allow the device to boot up completely.
This method is less effective for persistent issues or when preparing to transfer ownership, as it doesn't perform a full factory reset.
Different Alarm.com Doorbell Models and Reset Procedures
Alarm.com partners with various hardware manufacturers to offer doorbell cameras. While the core functionality and Alarm.com integration are consistent, the physical design and specific reset button locations can differ. It's essential to identify your specific model to ensure you're following the correct procedure.
Common Alarm.com Doorbell Manufacturers and Their Reset Methods
Here's a look at some common manufacturers whose doorbells are compatible with Alarm.com and typical reset procedures. Always verify with the specific model's documentation.
1. SkyBell (e.g., SkyBell HD, SkyBell Trim Plus)
SkyBell devices are popular for their integration with Alarm.com. The reset button is usually located on the side or back of the unit.
Reset Steps for SkyBell:
- Locate the small reset button on the side of the device.
- Using a paperclip, press and hold the reset button for approximately 20-30 seconds.
- The LED indicator light will change color (often flashing blue or red) to indicate the reset is in progress.
- Release the button and allow the device to reboot.
- Reconfigure through the Alarm.com app.
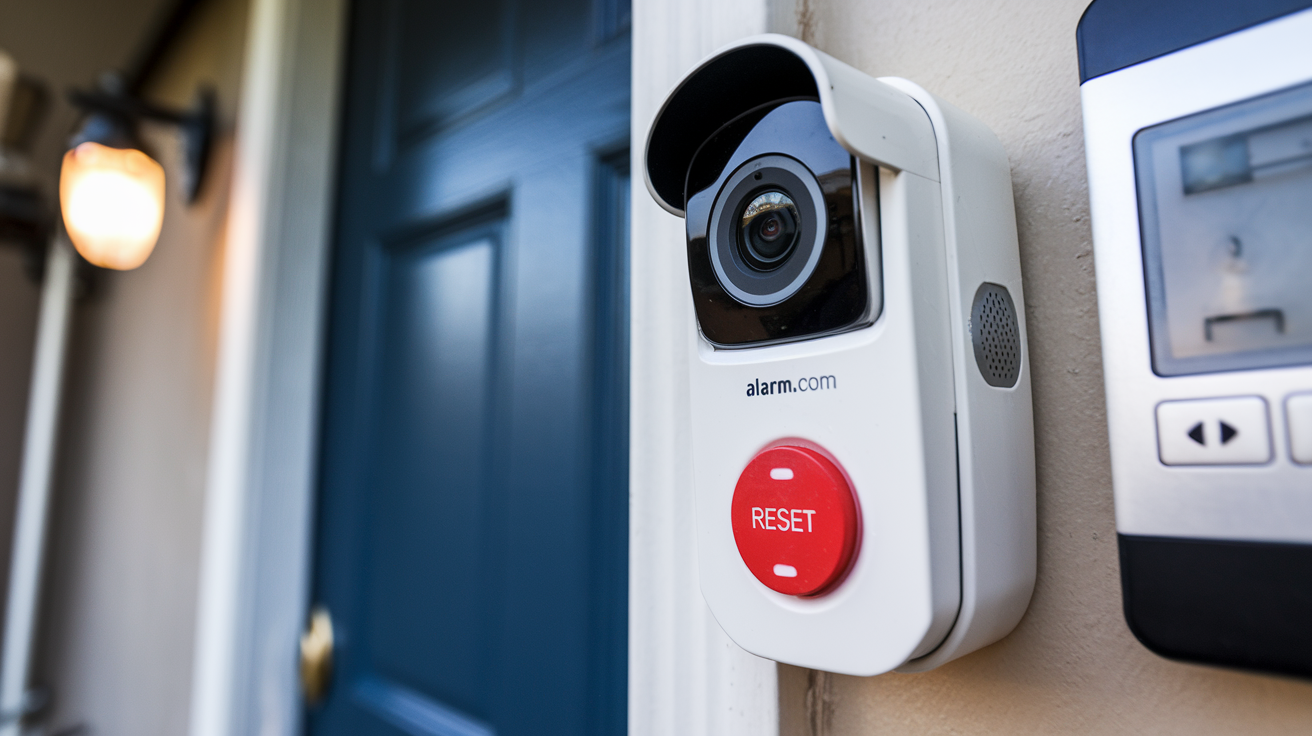
2. ADC-VDB770 / ADC-VDB770-A (Alarm.com's branded doorbell)
Alarm.com's own branded doorbells often have a streamlined design. The reset button might be integrated into the wiring terminals or a small port.
Reset Steps for ADC-VDB770:
- Turn off power to the doorbell at the circuit breaker.
- Locate the reset button. For the VDB770, it's often a small pinhole button on the back of the unit, near the wiring terminals.
- While the device is powered off, insert a paperclip into the reset button and press and hold it.
- Keep holding the button down and turn the power back on at the circuit breaker.
- Continue holding the button for about 15-20 seconds after power is restored, or until you see the indicator light change (e.g., flash amber).
- Release the button. The device will reboot and perform a factory reset.
- Proceed with re-adding the doorbell to your Alarm.com account.
3. Other Manufacturers (e.g., Alarm.com branded older models, third-party integrations)
For other Alarm.com compatible doorbells, the reset button is typically a small, recessed button. Common locations include:
- On the back of the unit.
- On the side panel.
- Underneath a removable cover or faceplate.
- Sometimes integrated into the wiring terminals.
General Procedure for other models:
- Find the reset button.
- Press and hold the button for 10-30 seconds (refer to manual).
- Observe indicator lights for confirmation.
- Release the button and allow the device to restart.
- Follow the on-screen prompts in the Alarm.com app or your security provider's platform to set up the doorbell again.
Using the Alarm.com App for Troubleshooting (Not a Reset)
It's important to distinguish a factory reset from other troubleshooting steps within the Alarm.com app. The app might allow you to restart the device remotely or clear its cache, but these are not factory resets. A factory reset is a hardware-level operation that erases all configurations.
Note: If you are unsure about your doorbell model, consult the original packaging, the installer's documentation, or contact your security service provider.
Troubleshooting Common Issues After Reset
After performing a factory reset and reconfiguring your Alarm.com doorbell camera, you might encounter a few common issues. These are usually related to the re-setup process or the device re-establishing its connection.
Issue 1: Doorbell Camera Not Connecting to Wi-Fi
Possible Causes:
- Incorrect Wi-Fi password entered during setup.
- Weak Wi-Fi signal at the doorbell's location.
- Router settings (e.g., MAC filtering, firewall).
- The doorbell is too far from the router.
- Network compatibility (e.g., trying to connect to a 5GHz network when the doorbell only supports 2.4GHz). Most smart doorbells exclusively use the 2.4GHz band for better range.
Solutions:
- Double-check your Wi-Fi password for typos.
- Move your router closer to the doorbell temporarily during setup, or consider a Wi-Fi extender or mesh system.
- Ensure your router is broadcasting a 2.4GHz network.
- Temporarily disable any advanced router security settings like MAC filtering to see if that resolves the issue.
- Restart your router and modem.
Issue 2: Doorbell Not Appearing in Alarm.com App
Possible Causes:
- The device was not successfully added to your Alarm.com account.
- The app needs to be refreshed.
- Account synchronization issues.
Solutions:
- Ensure you followed the exact steps for adding the device in the Alarm.com app or through your security provider's portal.
- Log out of the Alarm.com app and log back in.
- Try accessing your Alarm.com account via the web portal to see if the device appears there.
- If the device was previously linked to another account, it might need to be de-provisioned by the previous owner or service provider.
Issue 3: No Notifications Received
Possible Causes:
- Notification settings in the Alarm.com app are disabled or not configured correctly.
- App permissions on your smartphone are not enabled for notifications.
- Motion detection zones or sensitivity are not set up.
- The doorbell camera is offline.
Solutions:
- Go to the Alarm.com app settings and ensure notifications are enabled for the doorbell. Check specific event types (e.g., motion, doorbell press).
- On your smartphone, go to settings and ensure the Alarm.com app has permission to send notifications.
- Configure motion detection zones and adjust sensitivity levels.
- Verify the doorbell camera is online and connected to Wi-Fi.
Issue 4: Two-Way Audio Not Working
Possible Causes:
- Microphone or speaker issues on the doorbell.
- App permissions for microphone access are not granted.
- Network latency or bandwidth issues.
Solutions:
- Ensure the Alarm.com app has permission to access your phone's microphone.
- Check for any obstructions covering the microphone or speaker on the doorbell.
- Test the audio by pressing the doorbell button and speaking. Then, try speaking from the app.
- A poor internet connection on either end can cause audio problems.
Issue 5: Video Feed is Laggy or Pixelated
Possible Causes:
- Poor Wi-Fi signal strength.
- Insufficient internet upload speed.
- Router overload or other devices consuming bandwidth.
- The doorbell camera itself might be overheating or experiencing hardware issues.
Solutions:
- Improve the Wi-Fi signal strength to the doorbell.
- Check your internet upload speed. Many smart doorbells require at least 1-2 Mbps upload speed per camera.
- Reduce the number of devices actively using your internet connection during testing.
- Ensure the doorbell has adequate ventilation and is not exposed to direct sunlight for extended periods, which can cause overheating.
If problems persist after a factory reset and following these troubleshooting steps, it might indicate a hardware failure or a more complex network configuration issue. In such cases, contacting support is the next logical step.
When to Contact Support
While a factory reset is a powerful troubleshooting tool, it's not always the solution. There are specific situations where you should reach out to your service provider or the manufacturer's support team.
Situations Requiring Professional Assistance
- Persistent Issues: If you've performed a factory reset, reconfigured the device, and are still experiencing the same problems, it's time to seek expert help. This could indicate a hardware defect or a deeper system integration issue.
- Hardware Damage: If the doorbell camera shows visible signs of physical damage (cracks, water ingress, corrosion), it's likely a hardware failure that cannot be fixed by a reset.
- Device Not Powering On: If the doorbell camera does not power on at all after checking the wiring and breakers, there might be an issue with the power supply or the device itself.
- Inability to Access Reset Button: If the reset button is inaccessible or damaged, you won't be able to perform a factory reset.
- Account Lockout or Registration Issues: If you are unable to re-register the device to your Alarm.com account or are facing account-related errors, your service provider can assist with account management.
- Complex Network Environments: If you have a complex home network setup (e.g., multiple routers, VLANs, custom firewall rules), a support technician can help diagnose network-specific conflicts.
- Firmware Corruption: In rare cases, a failed firmware update or reset process can corrupt the device's firmware, requiring specialized tools or support to resolve.
Who to Contact
Your first point of contact should generally be the company that installed your security system and provides your Alarm.com service. They have access to your account details and are familiar with your specific setup.
- Your Security System Installer/Provider: They can diagnose issues, schedule technician visits, and liaise with Alarm.com or the hardware manufacturer if necessary.
- Alarm.com Support: If your installer directs you to Alarm.com support, they can assist with platform-specific issues.
- Hardware Manufacturer Support: For issues directly related to the hardware (e.g., suspected defect), the manufacturer's support line might be the best option, especially if the device is out of warranty.
When contacting support, be prepared to provide:
- Your Alarm.com account number or customer ID.
- The exact model number of your doorbell camera.
- A detailed description of the problem and the troubleshooting steps you have already taken (including the factory reset).
- Any error messages you have encountered.
Advanced Tips and Maintenance
To ensure your Alarm.com doorbell camera functions optimally and to minimize the need for resets, consider these advanced tips and ongoing maintenance practices. In 2025, smart home devices are becoming more integrated, and proactive maintenance is key.
Regularly Update Firmware
Manufacturers frequently release firmware updates to improve performance, fix bugs, and enhance security. Ensure your doorbell camera's firmware is up-to-date. This is often handled automatically through the Alarm.com platform or your security provider, but it's good practice to check periodically.
Optimize Wi-Fi Network
A stable and strong Wi-Fi connection is paramount for smart doorbell performance. Consider:
- Wi-Fi Extenders or Mesh Systems: If your doorbell is far from your router, these can significantly improve signal strength. For 2025, mesh Wi-Fi systems are becoming increasingly affordable and effective for covering larger homes.
- Router Placement: Ensure your router is centrally located and not obstructed by large metal objects or appliances that can interfere with the signal.
- Band Steering: If your router supports it, ensure your doorbell is connected to the 2.4GHz band for better range.
Clean the Camera Lens
Over time, dust, dirt, and smudges can accumulate on the camera lens, degrading video quality. Gently clean the lens with a soft, lint-free microfiber cloth. Avoid using harsh chemicals or abrasive materials.
Check Power Supply
Ensure the doorbell is receiving adequate and stable power. If you're using existing doorbell wiring, it should meet the minimum voltage requirements specified by the manufacturer. Fluctuating power can lead to intermittent issues and the need for resets. If you suspect power issues, consult an electrician.
Utilize Smart Features Effectively
Take advantage of features like person detection and package detection (if available) to reduce unnecessary alerts. Properly configuring motion zones and sensitivity can also improve the user experience and reduce false alarms. In 2025, AI-powered analytics are becoming more sophisticated, offering better accuracy.
Regularly Review Event History
Periodically reviewing your doorbell camera's event history can help you identify patterns or unusual activity that might indicate a problem. It also ensures you're aware of what's happening around your home.
Consider a UPS for Your Modem/Router
In areas prone to power outages, a UPS (Uninterruptible Power Supply) for your modem and router can keep your internet connection active during short power interruptions, preventing your doorbell from going offline unnecessarily.
Conclusion: Getting Your Doorbell Back Online
Resetting your Alarm.com doorbell camera is a fundamental troubleshooting step that can resolve a wide array of common issues, from connectivity glitches to software malfunctions. By understanding the process, preparing adequately, and following the step-by-step instructions tailored to your specific model, you can effectively restore your device to its optimal working condition. Remember that a factory reset will erase all previous settings, so be ready to reconfigure your Wi-Fi and account details. If you encounter persistent problems after a reset, don't hesitate to reach out to your security provider or the manufacturer's support for further assistance. Proactive maintenance and a stable network are key to ensuring your smart doorbell provides reliable security and convenience for years to come.