Setting up a home alarm system is a crucial step in safeguarding your property and loved ones. This comprehensive guide will walk you through the entire process, from choosing the right system to configuring its features, ensuring you achieve optimal security with confidence and ease.
Understanding Your Home Security Needs
Before diving into the technicalities of setting up a home alarm system, it's vital to conduct a thorough assessment of your specific security requirements. This initial step is foundational to selecting and configuring a system that effectively addresses your vulnerabilities and provides peace of mind. Consider the size and layout of your home, the number of entry points (doors, windows), the presence of valuable assets, and the typical activity patterns within your household. For instance, a sprawling multi-story house will require a different sensor placement strategy than a compact apartment. If you have pets, you'll need to consider pet-immune motion sensors to avoid false alarms. The level of risk you perceive, based on your neighborhood's crime statistics (which, according to FBI data for 2024, show a slight decrease in property crimes but a persistent need for vigilance), also plays a significant role. Think about whether you need basic intrusion detection or a more comprehensive system that includes environmental monitoring (like smoke or carbon monoxide detection) or even video surveillance. Understanding these nuances will guide you towards the most suitable system type and components.
Assessing Your Property's Vulnerabilities
Walk through your home, both inside and out, with a critical eye. Identify all potential entry points that could be exploited by an intruder. This includes not just main doors and ground-floor windows, but also basement windows, accessible upper-floor windows (e.g., near a flat roof or balcony), garage doors, and any pet doors.
- Doors: Check the sturdiness of door frames and locks. Sliding glass doors are often weaker points.
- Windows: Examine latches and glass panes. Consider if any are easily accessible from the outside.
- Garages: An attached garage can provide a direct entry point into your home.
- Outdoor Structures: Sheds or detached garages might contain valuable tools or equipment that need protection.
Considering Your Lifestyle and Household Members
Your daily routine and the people living in your home significantly influence alarm system needs. For families with young children, ease of use and reliable alerts are paramount. If you frequently travel, remote access and monitoring become more important. For elderly residents, simple arming/disarming procedures and emergency panic buttons are beneficial. Pet owners must select motion sensors designed to differentiate between humans and animals to prevent unnecessary alerts. According to a 2025 survey by Home Security Insights, 65% of homeowners with pets reported issues with false alarms before switching to pet-immune sensors.
Defining Your Security Goals
What do you primarily want your alarm system to achieve? Is it to deter burglars, alert you to a break-in, provide evidence in case of an incident, or monitor for environmental hazards? Your primary goals will dictate the types of sensors and features you prioritize. For example, if your main concern is preventing home invasions, a system with immediate audible alarms and professional monitoring might be your top choice. If you're more concerned about package theft or monitoring activity when you're away, video surveillance integrated with your alarm system could be essential.
Types of Home Alarm Systems
The market offers a diverse range of home alarm systems, each with its own set of features, installation requirements, and costs. Understanding these distinctions is key to making an informed decision. Broadly, systems can be categorized by their connectivity and installation method: wired, wireless, and hybrid. Beyond that, they differ in their monitoring capabilities, from self-monitored systems that alert your smartphone to professionally monitored systems that contact emergency services.
Wired vs. Wireless Systems
Wired systems have been the traditional choice, relying on physical wires connecting sensors, control panels, and sirens. They are known for their reliability and are less susceptible to signal interference. However, installation can be invasive and expensive, often requiring drilling through walls and ceilings, making them less practical for existing homes.
Wireless systems, on the other hand, use radio frequencies to communicate between components. They are significantly easier and quicker to install, making them ideal for DIY setups and rental properties. Modern wireless systems boast robust security protocols to prevent jamming. The primary drawback can be battery life for sensors, requiring periodic replacement.
DIY vs. Professionally Installed Systems
DIY systems are designed for self-installation, offering greater flexibility and often lower upfront costs. Users purchase the equipment and follow instructions to set up sensors, the control panel, and connect to their home network. This approach empowers homeowners with control over their system's configuration and maintenance.
Professionally installed systems are set up by trained technicians. While typically more expensive, they ensure optimal placement of components, proper calibration, and a seamless integration with monitoring services. This is often preferred by those who lack technical expertise or time, or for complex home layouts.
Monitored vs. Unmonitored Systems
Unmonitored (or self-monitored) systems alert you directly via smartphone notifications, emails, or text messages when an alarm is triggered. You are then responsible for assessing the situation and contacting authorities if necessary. This option offers lower monthly fees but places the burden of response on you.
Professionally monitored systems connect to a central monitoring station. When an alarm is triggered, trained operators assess the situation and dispatch emergency services (police, fire department) if a real threat is detected. This provides a higher level of security and peace of mind, especially when you're away from home, but comes with a monthly subscription fee. In 2025, approximately 45% of U.S. households with security systems opt for professional monitoring, according to Statista.
Smart Home Alarm Systems
These systems integrate with other smart home devices, such as smart locks, lights, and thermostats, allowing for a more cohesive and automated security experience. They can be controlled via smartphone apps, voice commands, and can be programmed to perform actions like turning on lights when an alarm is triggered or unlocking doors for emergency responders.
Planning Your Alarm System Layout
A well-planned layout is critical for the effectiveness of your home alarm system. Proper placement of sensors and the control panel ensures comprehensive coverage and minimizes blind spots. This planning phase involves understanding the function of each component and how they work together to create a secure perimeter and interior detection zone.
Control Panel Placement
The control panel, often the brain of the system, should be located in a discreet yet accessible area. Consider placing it near your primary entry point, but not so close that an intruder could easily disable it upon entry. A central location within the home can also be effective, allowing for easier access when arming or disarming.
- Accessibility: Ensure it's easy for household members to reach.
- Discretion: Avoid highly visible areas that might tempt an intruder.
- Power Source: It needs to be near a reliable power outlet.
- Connectivity: If it's a smart system, consider Wi-Fi signal strength.
Sensor Placement Strategy
Each type of sensor has optimal placement guidelines to maximize its effectiveness.
Door and Window Sensors (Contact Sensors)
These are typically installed on all exterior doors and accessible windows. One part attaches to the frame, and the other to the opening surface. When the two parts separate, the sensor triggers an alert.
- Doors: Install on all ground-floor doors, including patio doors and garage entry doors.
- Windows: Prioritize ground-floor windows and any windows on the first floor that are easily reachable from balconies or adjacent structures.
- Basement: Don't forget basement windows, which are often overlooked.
Motion Sensors
Motion sensors detect movement within a room. They are most effective when placed in high-traffic areas or rooms containing valuables.
- Corners: Mounting in corners provides the widest field of view.
- Height: Typically mounted at a height of 6-8 feet.
- Avoid Obstructions: Ensure they are not blocked by furniture or curtains.
- Pet Considerations: If you have pets, use pet-immune sensors and position them to avoid false triggers (e.g., not pointing directly at pet beds or areas where pets frequently climb).
- Placement Areas: Hallways, living rooms, main entry areas, and rooms with valuable electronics are good candidates.
Glass Break Sensors
These sensors listen for the specific sound frequency of breaking glass. They are ideal for rooms with multiple windows or large glass panes.
- Line of Sight: Place them where they have a clear "view" of the windows they are protecting.
- Coverage: One sensor can often cover multiple windows within a room.
Environmental Sensors
These include smoke detectors, carbon monoxide detectors, and flood sensors.
- Smoke/CO Detectors: Install on every level of your home, especially near sleeping areas, and in kitchens.
- Flood Sensors: Place in areas prone to water damage, such as basements, under sinks, and near water heaters or washing machines.
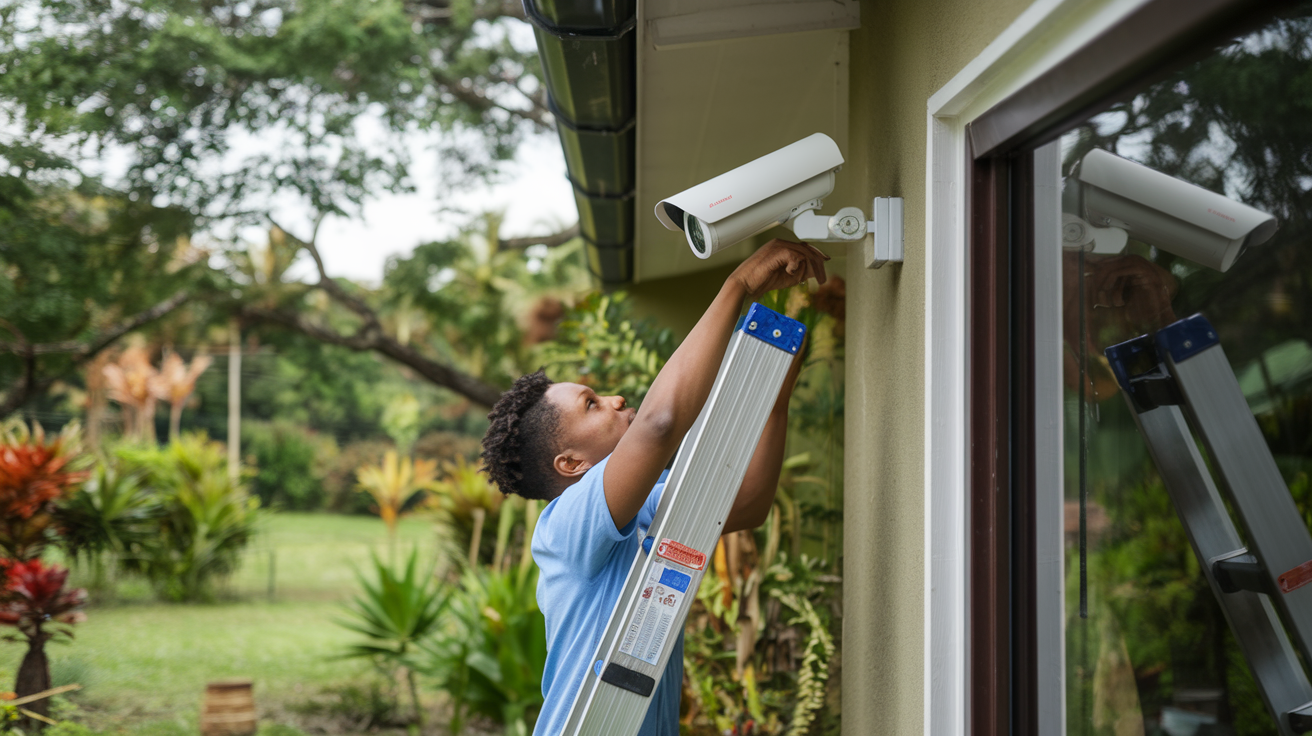
Camera Placement (If Applicable)
If your system includes cameras, strategic placement is key for surveillance and deterrence.
- Exterior: Position cameras to cover main entry points, driveways, and vulnerable areas like backyards.
- Interior: Consider placing cameras in main living areas or hallways to monitor activity when you're away. Ensure privacy is respected in bedrooms and bathrooms.
DIY vs. Professional Installation
The decision between installing a home alarm system yourself (DIY) or hiring a professional is a significant one, impacting cost, time, and the overall effectiveness of your security setup. Both approaches have distinct advantages and disadvantages that cater to different homeowner needs and preferences.
DIY Installation
Pros:
- Cost Savings: Eliminates installation fees, which can range from $100 to $500 or more, making it a more budget-friendly option.
- Flexibility: You can install the system on your own schedule, without needing to coordinate with a technician.
- Customization: You have complete control over sensor placement and system configuration.
- No Contracts (Often): Many DIY systems don't require long-term monitoring contracts, offering more freedom.
Cons:
- Time Investment: Installation can take several hours, depending on the system's complexity and your home's size.
- Technical Skill Required: While designed to be user-friendly, some technical aptitude is necessary for setup and troubleshooting.
- Potential for Errors: Incorrect sensor placement or configuration can lead to false alarms or missed detections.
- Limited Support: You are primarily responsible for troubleshooting any issues that arise.
Best for: Tech-savvy individuals, renters, those on a tight budget, or homeowners with smaller, simpler properties.
Professional Installation
Pros:
- Expertise: Technicians have the knowledge to optimize sensor placement, ensure proper calibration, and integrate the system seamlessly.
- Time Savings: Professionals can typically install a system much faster than a DIYer.
- Warranty and Support: Installation is often backed by a warranty, and ongoing support is usually available.
- Complex Systems: Ideal for larger homes, advanced systems, or those requiring hardwiring.
Cons:
- Higher Cost: Installation fees can be substantial.
- Scheduling: You need to coordinate with the installation company's schedule.
- Less Control: You have less direct input on the exact placement and configuration unless you communicate clearly with the technician.
- Potential for Contracts: Often bundled with monitoring services that require long-term contracts.
Best for: Homeowners who want a hassle-free experience, have complex security needs, lack technical confidence, or prefer the assurance of expert installation.
Choosing the Right Path
Consider your comfort level with technology, the complexity of your home, your budget, and the amount of time you can dedicate. For many modern wireless systems, DIY installation is quite manageable. However, if you're investing in a comprehensive system with many components or have a large, intricate property, professional installation might offer greater peace of mind and a more robust setup.
Step-by-Step DIY Installation Guide
Installing a DIY home alarm system is an achievable task for most homeowners. This guide breaks down the process into manageable steps, ensuring you can set up your system effectively and confidently. Always refer to your specific system's manual for detailed instructions, as components and procedures can vary.
Step 1: Unboxing and Inventory
Carefully unbox all components and lay them out. Compare the contents against the packing list in your manual to ensure nothing is missing or damaged. Familiarize yourself with each piece: the control panel (hub), door/window sensors, motion detectors, keypad, any cameras, and necessary mounting hardware.
Step 2: Install the Control Panel (Hub)
This is the central unit that communicates with all other devices. Choose a location that is:
- Central: For optimal wireless signal distribution throughout your home.
- Near a Power Outlet: It needs a constant power source.
- Near Your Router (if wired internet is required): Some hubs connect via Ethernet.
Follow the manufacturer's instructions to plug it in and connect it to your home network (Wi-Fi or Ethernet). This usually involves downloading a mobile app and following on-screen prompts.
Step 3: Install Door and Window Sensors
These are typically two-part magnetic sensors. Clean the surface where you plan to mount them. Ensure the two parts are aligned correctly and close enough when the door/window is shut (usually within 1 inch). Use the provided adhesive strips or screws for mounting.
- Clean Surfaces: Ensure the door/window and frame are clean and dry.
- Position the Sensor: Attach one part to the door/window and the other to the frame. The arrows or alignment marks on the sensors should line up.
- Test: Close the door/window and check if the sensor registers as "closed" in your app or on the control panel.
- Repeat: Install on all designated entry points.
Step 4: Install Motion Sensors
Mount motion sensors in corners or on walls in high-traffic areas or rooms you want to monitor. Follow these guidelines:
- Height: Typically 6-8 feet off the ground.
- Angle: Position to cover the largest possible area, avoiding direct sunlight or heat sources that could cause false alarms.
- Pet Immunity: If using pet-immune sensors, ensure they are installed at the recommended height and orientation according to the manual to avoid detecting pets.
- Mounting: Use the provided screws or adhesive.
Step 5: Install Keypads and Other Devices
Keypads: If your system includes a keypad, install it near your primary entry/exit point for easy arming and disarming. Ensure it's within wireless range of the control panel.
Glass Break Sensors: Mount them on a wall or ceiling in a room with windows, ensuring a clear line of sight to the glass.
Cameras: Follow specific instructions for your cameras, considering power sources and Wi-Fi connectivity.
Step 6: Connect Devices to the Hub
This is often done through the mobile app. The app will guide you through a pairing process, usually involving pressing a button on the sensor or entering a code. The hub will then recognize and register each device. Ensure each device is correctly identified (e.g., "Front Door Sensor," "Living Room Motion Detector").
Step 7: Configure System Settings
Use the mobile app or web portal to customize your system's behavior. This includes setting entry and exit delays, defining alarm sounds, naming zones, and setting up user codes. (See the next section for more detail).
Step 8: Test the System Thoroughly
This is a critical step often overlooked. Test every sensor individually. Arm the system in "test mode" (if available) or be prepared to disarm it quickly. Open doors, windows, and walk in front of motion sensors to ensure they trigger the alarm as expected. Verify that you receive notifications on your smartphone.
Configuring Your Alarm System
Once your home alarm system is physically installed, the next crucial phase is configuring its settings to align with your security needs and preferences. This step transforms a collection of components into a cohesive, intelligent security solution. Most modern systems are configured via a smartphone app or a web portal, offering a user-friendly interface.
Setting Up User Codes and Access
Create unique user codes for each member of your household. This not only enhances security by allowing you to track who arms or disarms the system but also simplifies operation. Consider assigning different levels of access if your system supports it (e.g., master codes, user codes, guest codes).
- Master Code: Full access to all system functions.
- User Codes: For daily arming/disarming.
- Guest Codes: Temporary codes for visitors or service personnel.
Configuring Entry and Exit Delays
These delays provide a grace period for you to leave the house after arming the system or to disarm it upon entering without triggering an immediate alarm. Typical settings are 30-60 seconds for exit and 30-90 seconds for entry.
- Exit Delay: The time you have to leave after arming the system. Set this to be long enough for everyone to exit comfortably.
- Entry Delay: The time you have to disarm the system after entering through a designated entry door. Set this to be sufficient for you to reach the keypad and enter your code.
Important: Ensure that doors and windows designated as "instant" (e.g., basement windows) do not have entry delays applied.
Defining Zones and Sensor Names
Most systems allow you to group sensors into "zones" and assign descriptive names. This helps you quickly identify the source of an alarm.
- Zone Types: Understand different zone types, such as interior, perimeter, instant, delay, and follow-in.
- Naming Convention: Use clear, concise names like "Front Door," "Living Room Window," "Master Bedroom Motion."
Customizing Alarm Behavior
Configure how the system responds to triggered alarms.
- Audible Alarms: Set the duration and volume of sirens.
- Notifications: Specify how and to whom alerts are sent (e.g., push notifications, SMS, email).
- Chime Feature: Many systems offer a chime that sounds when a door or window is opened, useful for monitoring activity even when the system is disarmed.
Setting Up Monitoring Services
If you opt for professional monitoring, you'll need to activate this service. This typically involves providing your contact information, emergency contact details, and potentially a "safe word" for verification purposes with the monitoring center. You may need to provide the monitoring company with your system's unique identifier.
Integrating with Smart Home Devices (If Applicable)
If your alarm system supports smart home integration, follow the app's instructions to connect it with other devices like smart locks, lights, or voice assistants (e.g., Alexa, Google Assistant). This allows for automated actions, such as lights turning on when an alarm is triggered or voice control of arming/disarming.
Creating Schedules and Automation
Some advanced systems allow you to create schedules for arming/disarming or set up automation rules. For example, you might schedule the system to automatically arm to "Stay" mode at night or to arm to "Away" mode when you leave the house based on your phone's location (geofencing).
Testing and Maintenance
Regular testing and maintenance are essential to ensure your home alarm system functions reliably when you need it most. Neglecting these aspects can render your system ineffective and leave your home vulnerable. Aim to perform a full system test at least quarterly, and conduct smaller checks more frequently.
Quarterly System Testing
This involves systematically checking every component of your alarm system.
- Notify Monitoring Center (if applicable): If you have professional monitoring, call them to inform them you are testing your system. This prevents unnecessary dispatch of emergency services.
- Test Each Sensor:
- Door/Window Sensors: Open each protected door and window one by one. The system should register the opening.
- Motion Sensors: Walk in front of each motion sensor. The system should detect your movement.
- Glass Break Sensors: Some systems have a test mode for these. If not, you may need to simulate the sound (refer to manual).
- Environmental Sensors: Test smoke and CO detectors according to their manufacturer's instructions (often involves pressing a test button).
- Test Keypads and Remotes: Ensure all keypads and remote controls can arm and disarm the system.
- Verify Notifications: Check that you receive alerts on your smartphone or other designated devices for each triggered sensor.
- Disarm and Conclude Test: Once all components are tested, disarm the system and inform the monitoring center (if applicable) that testing is complete.
Regular Maintenance Tasks
Beyond testing, several routine maintenance tasks will keep your system in optimal working order.
- Battery Replacement: Wireless sensors are battery-powered. Check your system's app or control panel for low battery indicators and replace batteries promptly. Most batteries last 1-3 years, but this can vary. Keep spare batteries on hand.
- Clean Sensors: Dust and debris can interfere with sensor performance. Gently wipe down sensors with a soft, dry cloth periodically.
- Check for Damage: Inspect all components for any signs of physical damage, wear, or tampering.
- Update Software: If your system has a smart hub or cameras, ensure their firmware and associated apps are kept up-to-date. Updates often include security patches and performance improvements.
- Review User Codes: Periodically review who has access codes and remove any that are no longer needed (e.g., for former tenants or service providers).
Troubleshooting Common Issues
If you encounter problems, consult your system's manual first. Common issues and their potential solutions include:
- False Alarms: Often caused by incorrect sensor placement, pets, environmental factors (e.g., drafts, heat sources), or low batteries.
- Sensors Not Responding: Check battery levels, ensure the sensor is within range of the hub, and verify it's properly paired.
- Connectivity Issues: Ensure your Wi-Fi network is stable. For wired hubs, check the Ethernet connection.
Advanced Features and Integrations
Modern home alarm systems are no longer just about detecting intruders. They are evolving into sophisticated hubs for home automation and security, offering a range of advanced features and seamless integrations with other smart devices. Leveraging these capabilities can significantly enhance your home's security, convenience, and overall smart living experience.
Video Surveillance Integration
Many alarm systems can integrate with indoor and outdoor security cameras. This allows you to:
- Live View: Monitor your property in real-time via your smartphone app.
- Event Recording: Cameras can be programmed to record footage when a sensor is triggered, providing visual evidence of an incident.
- Two-Way Audio: Some cameras allow you to speak with visitors or deter potential intruders remotely.
- Package Detection: Advanced systems can alert you to activity at your doorstep, helping to prevent package theft.
Smart Lock Integration
Connecting your alarm system to smart locks offers enhanced control over home access:
- Remote Locking/Unlocking: Lock or unlock your doors from anywhere using your smartphone app.
- Automated Arming/Disarming: Set the system to automatically arm when you lock the door from the outside or disarm when you unlock it with your code.
- Guest Access: Grant temporary access codes to guests or service providers that expire after a set time.
Smart Lighting and Automation
Integrating with smart lights can bolster security and convenience:
- Deterrence: Program lights to turn on automatically when an alarm is triggered, potentially scaring off intruders.
- Welcome Home: Have lights turn on as you disarm the system.
- Simulated Occupancy: Schedule lights to turn on and off randomly when you're away to make it appear as though someone is home.
Environmental Monitoring and Alerts
Beyond intrusion detection, many systems offer comprehensive environmental monitoring:
- Smoke and Carbon Monoxide Detection: Integrated detectors can alert you and the monitoring center to fire or CO hazards.
- Water Leak Detection: Sensors placed in basements, bathrooms, or near appliances can alert you to leaks, preventing costly water damage.
- Temperature Alerts: Receive notifications if your home's temperature drops too low (risk of frozen pipes) or gets too high.
Voice Control Integration
Connect your alarm system to popular voice assistants like Amazon Alexa or Google Assistant for hands-free operation. You can typically arm the system, check its status, or even disarm it (often requiring a voice PIN for added security) using voice commands.
Geofencing Capabilities
Geofencing uses your smartphone's GPS to create a virtual boundary around your home. The system can then automatically arm or disarm based on your proximity. For example, it can remind you to arm the system when you leave or disarm it when you arrive home.
Professional Monitoring Services
While not strictly an "advanced feature" in the tech sense, the option for professional monitoring elevates a basic alarm system to a comprehensive security solution. This ensures that a trained professional is always watching over your home and can dispatch emergency services when needed, providing an unparalleled layer of security.
Understanding Monitoring Options
The choice of monitoring for your home alarm system is a critical decision that significantly impacts the level of security and your peace of mind. Broadly, these options fall into two main categories: self-monitoring and professional monitoring. Each has distinct advantages, disadvantages, and associated costs.
Self-Monitoring
In a self-monitored system, the alarm panel and connected sensors communicate directly with your smartphone or other designated devices. When an event occurs (e.g., a door opens, motion is detected), you receive an alert.
How it Works:
- The system connects to your home's Wi-Fi network.
- When a sensor is triggered, it sends a signal to the control panel.
- The control panel then sends a notification (push alert, SMS, or email) to your smartphone app.
- You are responsible for assessing the situation based on the notification and any available camera feeds.
- You must then contact the appropriate emergency services (police, fire department) yourself if you believe there is a threat.
Pros:
- Lower Cost: Typically no monthly fees or significantly lower fees than professional monitoring.
- No Contracts: Often available without long-term contracts.
- Full Control: You are in complete control of when and how to respond.
Cons:
- Reliance on You: If you miss an alert (e.g., phone is off, you're in an area with no signal, or you're asleep), there is no backup.
- Burden of Response: You must always be the one to contact emergency services, which can be stressful in an emergency.
- Potential for Delayed Response: If you are unavailable, the response time to an actual emergency can be significantly delayed.
Best for: Budget-conscious individuals, those who are always near their phone, or those who prefer to manage their own security responses.
Professional Monitoring
With professional monitoring, your alarm system is connected to a central monitoring station staffed by trained professionals 24/7. This offers a robust and reliable security solution.
How it Works:
- When a sensor is triggered, the signal is sent to the monitoring station.
- Trained operators receive the alert and can view system information (e.g., which sensor was triggered).
- They will attempt to verify the alarm by contacting you or your designated emergency contacts.
- If they cannot reach you, or if the situation warrants it, they will dispatch the appropriate emergency services (police, fire, medical).
- Many systems include a "safe word" or verification process to ensure they don't dispatch authorities for false alarms.
Pros:
- 24/7 Protection: Constant monitoring ensures a response even when you are unavailable.
- Faster Response: Professionals are trained to act quickly and efficiently.
- Peace of Mind: Knowing that trained personnel are watching over your home provides significant reassurance.
- Potential Insurance Discounts: Many insurance companies offer discounts for homes with professionally monitored alarm systems.
Cons:
- Monthly Fees: Requires a recurring subscription fee, which can range from $20 to $60+ per month depending on the provider and services.
- Contracts: Often involves a contract, typically 1-3 years.
- Potential for False Alarm Fees: Some municipalities charge fees for unnecessary dispatches, though monitoring companies often work to prevent this.
Best for: Homeowners seeking the highest level of security, those who travel frequently, families with children or elderly members, or anyone who wants the assurance of professional oversight.
Choosing the Right Option
Your decision should be based on your budget, lifestyle, perceived risk, and desired level of security. For many, the added security and peace of mind offered by professional monitoring outweigh the monthly cost. However, self-monitoring can be a perfectly adequate solution for those who are diligent and always connected.
Common Mistakes to Avoid
Setting up a home alarm system is a significant investment in your security, but common pitfalls can undermine its effectiveness. Being aware of these mistakes can help you avoid them and ensure your system provides the protection you expect. From improper installation to neglecting maintenance, here are the most frequent errors homeowners make.
1. Inadequate Planning and Assessment
Mistake: Rushing into buying a system without properly assessing your home's vulnerabilities, lifestyle needs, or desired security goals. This can lead to buying a system that's too basic, too complex, or has components placed ineffectively.
Solution: Conduct a thorough walkthrough of your property, identify all entry points, consider your household's specific needs (pets, children, elderly), and define your primary security objectives before selecting a system.
2. Incorrect Sensor Placement
Mistake: Placing sensors in suboptimal locations, such as motion detectors facing windows (sunlight can trigger them), door sensors too far apart, or not covering all accessible entry points.
Solution: Follow manufacturer guidelines strictly for sensor placement. For motion sensors, consider corners for maximum coverage and avoid heat sources or direct sunlight. Ensure door/window sensors are within the recommended proximity when closed.
3. Neglecting System Testing
Mistake: Installing the system and assuming it will always work without regular testing. Batteries can die, connections can loosen, and software can glitch.
Solution: Schedule regular system tests (at least quarterly) to ensure every sensor, the control panel, and any communication links are functioning correctly. If you have professional monitoring, notify them before testing.
4. Forgetting About Battery Maintenance
Mistake: Wireless sensors rely on batteries. Ignoring low battery warnings or not replacing batteries proactively can lead to a sensor failing unexpectedly.
Solution: Keep track of battery life, replace batteries as indicated by your system, and consider keeping spare batteries on hand for critical sensors.
5. Over-Reliance on One Type of Sensor
Mistake: Using only one type of sensor (e.g., only door/window contacts) and neglecting others like motion detectors or glass break sensors, leaving potential gaps in coverage.
Solution: Implement a layered security approach using a combination of sensors: contact sensors for entry points, motion detectors for interior zones, and glass break sensors for rooms with multiple windows.
6. Using Weak or Default Passwords/PINs
Mistake: Leaving default user codes unchanged or using easily guessable PINs for system access or app logins.
Solution: Always change default passwords and PINs to strong, unique combinations. Use different codes for different users and consider a voice PIN for app disarming if available.
7. Not Understanding Monitoring Options
Mistake: Choosing self-monitoring without understanding the responsibility it entails, or signing up for professional monitoring without understanding the contract terms or fees.
Solution: Carefully evaluate your needs and choose between self-monitoring and professional monitoring. If opting for professional monitoring, read the contract thoroughly and understand all associated costs and terms.
8. Ignoring Smart Home Integration Potential
Mistake: Failing to leverage advanced features like smart lock or camera integration, which can significantly enhance convenience and security.
Solution: Explore the integration capabilities of your alarm system. Connecting it with other smart devices can create a more automated and robust security ecosystem.
9. Not Informing Household Members
Mistake: Installing a system without ensuring all household members know how to arm/disarm it, understand the delays, and know what to do in case of an alarm.
Solution: Conduct a "training session" with everyone in the household. Ensure they know their user codes, the purpose of entry/exit delays, and how to respond to alerts.
10. Overlooking Environmental Sensors
Mistake: Focusing solely on intrusion detection and neglecting vital environmental sensors like smoke and carbon monoxide detectors.
Solution: Integrate smoke, CO, and water leak detectors into your alarm system for comprehensive home protection beyond just break-ins. These can be life-saving.
By understanding and actively avoiding these common mistakes, you can ensure your home alarm system is a reliable and effective guardian of your property and loved ones.
Conclusion
Setting up a home alarm system is a proactive and essential step towards securing your peace of mind and protecting your valuable assets. By thoroughly understanding your home's unique security needs, exploring the various types of systems available, and meticulously planning your installation, you lay the groundwork for an effective defense. Whether you opt for the flexibility of a DIY setup or the assurance of professional installation, remember that proper configuration and regular testing are paramount. Leveraging advanced features like smart home integrations can further enhance your system's capabilities, offering convenience and layered security. Ultimately, the decision between self-monitoring and professional monitoring hinges on your personal priorities and budget, with each offering distinct benefits. By avoiding common installation and maintenance mistakes, you ensure your system remains a robust guardian. Investing time and effort into setting up your home alarm system correctly is an investment in the safety and security of your home and family for years to come.