Setting up your Reolink PoE video doorbell is a straightforward process that significantly enhances your home security. This guide will walk you through each step, from unboxing to connecting to your network, ensuring a robust and reliable surveillance system for your peace of mind.
Introduction to Reolink PoE Video Doorbells
In the ever-evolving landscape of home security, smart video doorbells have become an indispensable tool. Among the leading brands, Reolink offers robust and feature-rich Power over Ethernet (PoE) video doorbells that provide a reliable and high-quality surveillance solution. Unlike Wi-Fi models, PoE doorbells draw power and transmit data through a single Ethernet cable, ensuring a stable connection and eliminating the need for separate power outlets near your door. This guide is designed to be your comprehensive resource for understanding and executing the setup of your Reolink PoE video doorbell, ensuring you can effectively monitor your property, communicate with visitors, and deter potential intruders.
The adoption of smart home security devices continues to surge. By the end of 2025, it's projected that over 60% of households in North America will have at least one smart security device, with video doorbells leading the charge. Reolink's PoE offerings are particularly attractive due to their stability and ease of integration into existing network infrastructure. This detailed walkthrough will cover everything from initial planning to advanced configuration, empowering you to maximize the benefits of your Reolink PoE video doorbell.
What You'll Need: Essential Components and Tools
Before you begin the installation process, it's crucial to gather all the necessary components and tools. Having everything on hand will streamline the setup and prevent interruptions. Reolink typically bundles most of what you need, but some basic tools are essential for a professional installation.
Core Reolink Components:
- Reolink PoE Video Doorbell: The main unit itself. Ensure it's the PoE model you intend to install.
- Mounting Bracket: Included with the doorbell, this is used to attach the doorbell to your wall.
- Ethernet Cable: This is the backbone of your PoE setup. You'll need a CAT5e or CAT6 Ethernet cable of sufficient length to reach from your router or PoE switch to the doorbell's location. Ensure it's rated for outdoor use if exposed to the elements.
- Power over Ethernet (PoE) Switch or Injector: This device provides both power and data connectivity over the Ethernet cable. If your router doesn't have built-in PoE ports, you'll need a separate PoE switch or a PoE injector. For 2025-26, PoE switches supporting standards like IEEE 802.3af or 802.3at are common and recommended for Reolink doorbells.
- Power Adapter (Optional/Backup): Some Reolink doorbells come with a backup power adapter, which can be useful for initial setup or as a failsafe.
- Chime (Optional): If you want an audible chime inside your home, Reolink offers compatible wired or wireless chimes.
- SD Card (Optional): For local video storage, you'll need a microSD card. Reolink doorbells typically support up to 128GB or 256GB cards, depending on the model.
Essential Tools for Installation:
- Drill and Drill Bits: For creating pilot holes and mounting holes. Masonry bits will be needed for brick or concrete.
- Screwdriver Set: Typically a Phillips head screwdriver is required for mounting screws and terminal connections.
- Wire Strippers: If you are hardwiring the doorbell and need to connect wires to a terminal block.
- Pliers: For gripping and manipulating wires.
- Level: To ensure your doorbell is mounted straight.
- Pencil or Marker: For marking drilling locations.
- Safety Glasses: To protect your eyes during drilling.
- Ladder: If the installation location is high.
- Network Cable Tester (Recommended): To ensure your Ethernet cable is properly terminated and functioning.
Having a clear understanding of these components and tools will set you up for a smooth and successful installation. For a comprehensive home security upgrade in 2025-26, integrating a reliable PoE doorbell is a smart move.
Planning Your Installation: Location, Wiring, and Network
Proper planning is the most critical phase of any installation. It ensures optimal performance, aesthetics, and functionality of your Reolink PoE video doorbell. This section will guide you through the essential considerations.
Choosing the Right Location:
The placement of your doorbell is paramount for its effectiveness. Consider the following:
- Field of View: The ideal height is typically between 4 and 5 feet (1.2 to 1.5 meters) from the ground. This height allows the camera to capture faces clearly while also seeing packages left at the doorstep.
- Angle: Most doors are not positioned perfectly for a straight-on camera view. You may need to angle the doorbell to capture the entire porch area and approaching visitors. Reolink often includes angled mounting brackets or suggests solutions for achieving the desired angle.
- Lighting: Avoid pointing the camera directly at bright light sources like the sun or porch lights, as this can wash out the image. However, ensure the area is sufficiently lit for clear nighttime viewing, or rely on the doorbell's infrared (IR) capabilities.
- Weather Protection: While Reolink doorbells are designed to be weather-resistant (IP65 or higher is common), try to mount it under an overhang if possible to protect it from direct rain, snow, and prolonged sun exposure. This can extend its lifespan.
- Proximity to Network: The closer the installation site is to your PoE switch or router, the less Ethernet cable you'll need, simplifying the installation.
Wiring Considerations:
PoE doorbells require an Ethernet cable connection. Here's what to think about:
- Existing Wiring: If you are replacing an old wired doorbell, you might be able to reuse the existing low-voltage wires. However, these are often insufficient for data transmission and PoE power. You will likely need to run a new CAT5e or CAT6 cable.
- Running the Cable: Plan the route for your Ethernet cable. This might involve drilling through exterior walls, running cables through attics, crawl spaces, or along existing conduits. Ensure the cable is protected from physical damage and the elements. Outdoor-rated Ethernet cables are essential for any exposed sections.
- PoE Power Source: Decide whether you will use a PoE switch or a PoE injector.
- PoE Switch: If you have multiple PoE devices or plan to expand your network with other PoE-enabled devices, a PoE switch is a versatile solution. It connects to your main router and provides PoE power to connected devices via Ethernet.
- PoE Injector: This is a simpler, single-device solution. It sits between your router (or a non-PoE switch) and the doorbell, injecting power into the Ethernet cable.
- Inside vs. Outside Connections: The Ethernet cable will need to terminate inside your home, connecting to your PoE switch or injector. Plan where this equipment will be located.
Network Requirements:
A stable network is crucial for the optimal performance of your Reolink PoE doorbell.
- Internet Speed: While PoE doorbells are less reliant on Wi-Fi, they still require a stable internet connection for remote access, notifications, and cloud storage (if used). Reolink recommends an upload speed of at least 1 Mbps for smooth live streaming and recordings. For 2025-26, with increasing video resolutions and features, 2 Mbps upload is becoming a more practical recommendation.
- Router Capabilities: Ensure your router can handle the additional network traffic. If you have a very old router, consider upgrading to a modern dual-band router for better overall network performance.
- Network Security: Enable WPA2 or WPA3 encryption on your Wi-Fi network and use a strong, unique password. This is vital for protecting your home network from unauthorized access.
By carefully considering these planning aspects, you lay the groundwork for a successful and efficient installation of your Reolink PoE video doorbell, ensuring it serves its purpose effectively for years to come.
Step-by-Step Physical Installation
This section details the physical installation of your Reolink PoE video doorbell. It's recommended to have a helper for some steps, especially when drilling or holding the doorbell in place.
Step 1: Prepare the Mounting Location
Using your chosen location from the planning phase:
- Mark Drilling Points: Hold the mounting bracket against the wall at the desired height. Use a level to ensure it's straight. Mark the screw hole locations with a pencil or marker.
- Drill Pilot Holes: If drilling into wood, use a drill bit slightly smaller than your mounting screws. If drilling into brick, concrete, or stucco, use a masonry bit of the appropriate size for the included wall anchors.
- Install Wall Anchors (if necessary): If using anchors, insert them into the drilled holes.
Step 2: Run the Ethernet Cable
This is often the most challenging part of the installation.
- Feed the Cable: Carefully feed the CAT5e or CAT6 Ethernet cable from your PoE switch/injector location to the marked mounting location. Ensure the cable is routed safely and protected from damage.
- Prepare the Cable End: Leave enough cable length at the mounting location to comfortably connect to the doorbell. You may need to strip a small portion of the outer jacket if connecting directly to a terminal block on the doorbell, or simply ensure the connector is ready if it's a standard RJ45.
Step 3: Mount the Bracket
- Secure the Bracket: Align the mounting bracket with the pilot holes or anchors. Use the provided screws to securely fasten the bracket to the wall. Ensure it's firmly attached and can support the weight of the doorbell.
Step 4: Connect the Ethernet Cable
This step varies slightly depending on your Reolink model.
- Through the Bracket: Most Reolink PoE doorbells have a channel or opening in the mounting bracket and the doorbell itself to route the Ethernet cable through.
- Connect to Doorbell:
- RJ45 Connector: Some models have a female RJ45 port on the back. Simply plug your Ethernet cable into this port.
- Terminal Block: Other models require you to connect the individual wires of the Ethernet cable to screw terminals. You'll need to strip the outer jacket and the individual wire insulation (if necessary) and connect them according to the diagram provided in your Reolink manual. Typically, this involves connecting the data pairs and the power pairs. Use wire strippers and a small screwdriver for this.
- Secure the Cable: Ensure the cable is neatly managed and doesn't put strain on the connection.
Step 5: Attach the Doorbell to the Bracket
- Align and Snap: Align the Reolink doorbell with the mounted bracket. Most models snap or slide into place. Ensure it's securely attached.
- Secure with Screw: Many Reolink doorbells have a small security screw at the bottom to prevent easy removal. Use the provided tool or a small screwdriver to tighten this screw.
Step 6: Connect the Ethernet Cable to Your Network
This is done at the other end of the cable.
- To PoE Switch/Injector: Connect the other end of the Ethernet cable to an available port on your PoE switch or PoE injector.
- Connect to Router (if using injector): If using a PoE injector, connect the injector's data port to your router or main network switch using a standard Ethernet cable.
Once the physical installation is complete, you can proceed to connect your doorbell to your network and configure its software settings. The stability of the PoE connection is a significant advantage over Wi-Fi, especially for 2025-26 smart home setups where reliability is key.
Connecting to Your Network: PoE and Wi-Fi Options
While the focus is on PoE, some Reolink doorbell models might offer a Wi-Fi fallback or setup option. Understanding both is crucial for a complete setup.
PoE Connection: The Primary Method
As detailed in the physical installation, the PoE connection is established via a single Ethernet cable. This cable carries both power and data.
- Automatic Power Up: Once the Ethernet cable is connected to a functional PoE port on your switch or injector, the doorbell should automatically power on. You might see indicator lights illuminate on the doorbell.
- Data Transmission: The same cable transmits data to your network, allowing the doorbell to communicate with your router and the internet. This eliminates the need for a separate Wi-Fi setup for the primary connection.
- Network Recognition: Your network should recognize the doorbell as a connected device. You might see it appear in your router's connected devices list or, more commonly, it will be discovered by the Reolink app.
Initial Setup via Wi-Fi (If Applicable)
Some Reolink PoE doorbell models may require an initial setup using Wi-Fi before fully committing to the PoE connection, or they might have a dual-band capability. Always refer to your specific model's manual.
- Temporary Power: If the doorbell requires Wi-Fi for initial setup, you might need to power it temporarily using a USB adapter (if supported) or the included power adapter, rather than the PoE cable, until the Wi-Fi credentials are set.
- Reolink App: Download the Reolink app on your smartphone or tablet.
- Add Device: Follow the app's instructions to add a new device. It will likely scan your local network for Reolink devices.
- Select Wi-Fi Network: If prompted, select your home Wi-Fi network and enter the password.
- Switch to PoE: Once the Wi-Fi connection is established and the doorbell is recognized in the app, you can then proceed with the physical PoE cable connection. The doorbell should automatically switch to the more stable PoE connection if detected.
Verifying the Connection
After connecting the Ethernet cable to your PoE source:
- Indicator Lights: Check the LED indicator lights on the doorbell. Reolink typically uses specific light patterns to indicate power status, network connection, and activity. Consult your manual for the meaning of these lights.
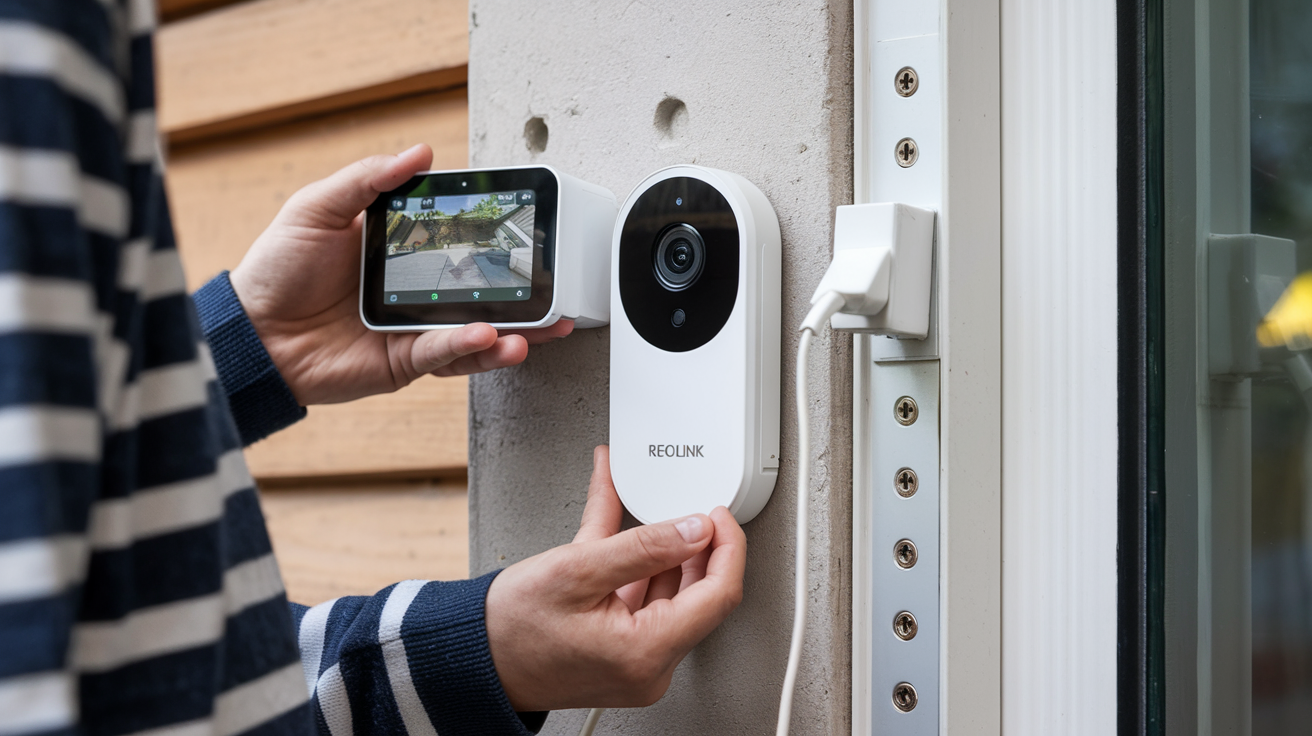
- Reolink App Discovery: Open the Reolink app. If the doorbell is properly connected to the network, it should appear in the device list. You may need to manually add it by scanning the QR code on the doorbell or entering its UID.
- Network Scan (Advanced): For advanced users, you can use network scanning tools (like Fing or your router's interface) to see if the doorbell's IP address is visible on your network.
The reliability of a PoE connection is a significant advantage for home security in 2025-26, offering a more stable and secure data stream compared to Wi-Fi, especially for critical surveillance devices.
Software Setup and App Configuration
Once your Reolink PoE video doorbell is physically installed and connected to your network, the next step is to configure it using the Reolink app. This is where you personalize its settings and integrate it into your smart home ecosystem.
Step 1: Download and Install the Reolink App
If you haven't already, download the Reolink app from your device's app store (Google Play Store for Android or Apple App Store for iOS). Install the app and create a Reolink account or log in if you already have one.
Step 2: Add Your Reolink Doorbell
With the doorbell powered on and connected to your network:
- Open the App: Launch the Reolink app.
- Tap the '+' Icon: This is usually located in the top-right corner of the app's home screen to add a new device.
- Scan QR Code: The app will prompt you to scan a QR code. This code is typically found on the back of the doorbell, on the product packaging, or in the user manual. Point your phone's camera at the QR code until it's recognized.
- Alternatively, Enter UID: If you can't scan the QR code, you can manually enter the doorbell's UID (Unique Identifier), which is also printed near the QR code.
- Set Device Password: You will be prompted to create a strong password for your doorbell. This is crucial for security.
- Name Your Device: Give your doorbell a descriptive name, such as "Front Doorbell."
Step 3: Initial Configuration within the App
Once the doorbell is added, you'll be able to access its settings.
- Live View: Tap on your doorbell's icon in the app to access the live view. This confirms the camera is working and connected.
- Device Settings: Navigate to the device settings menu (usually a gear icon). Here you can configure various aspects:
- Video Quality: Adjust the resolution and frame rate for live streaming and recording. Higher settings provide better clarity but consume more bandwidth and storage.
- Audio: Enable or disable the microphone and speaker for two-way talk.
- Motion Detection: Configure motion detection zones, sensitivity, and schedules. This is a key feature for receiving alerts.
- Notifications: Set up push notifications to your phone when motion is detected or when someone presses the doorbell.
- Storage: If you've inserted a microSD card, format it here and configure recording settings (continuous recording, motion-triggered recording).
- Network Settings: While PoE handles the primary connection, you might see options related to IP addresses (DHCP is usually default) or Wi-Fi settings if it's a dual-band model.
Step 4: Two-Way Talk and Alerts
- Two-Way Talk: Tap the microphone icon in the live view to speak through the doorbell. Tap the speaker icon to listen. This is invaluable for communicating with visitors remotely.
- Alerts: Ensure notifications are enabled in both the Reolink app and your phone's system settings. You should receive an alert when the doorbell is pressed or when motion is detected.
Step 5: Firmware Updates
Reolink regularly releases firmware updates to improve performance, add features, and patch security vulnerabilities. It's essential to keep your device updated.
- Check for Updates: In the device settings, look for a "Firmware" or "System" section. There should be an option to check for and install updates.
- Automatic Updates: Some models may offer automatic update options.
A well-configured Reolink doorbell, leveraging its PoE connection, provides a robust foundation for your home security in 2025-26. The app interface is designed to be user-friendly, making advanced features accessible.
Optimizing Your Reolink Doorbell: Advanced Settings
To truly maximize the potential of your Reolink PoE video doorbell, delving into its advanced settings is recommended. These configurations can fine-tune performance, enhance security, and integrate it more seamlessly into your smart home.
Motion Detection Zones and Sensitivity:
This is arguably the most critical advanced setting for reducing false alerts.
- Custom Zones: Instead of relying on the entire camera view, you can define specific areas (zones) where motion detection should be active. For example, you might exclude a busy street or a swaying tree branch.
- Sensitivity Levels: Adjust the sensitivity of motion detection. A higher sensitivity will detect smaller movements, while a lower sensitivity will only trigger for larger or more significant events. Finding the right balance is key.
- Schedule: Set specific times for motion detection to be active. You might want it active 24/7, or only during specific hours when you're away.
Recording Settings:
Tailor how and when your doorbell records footage.
- Continuous Recording vs. Motion-Triggered:
- Continuous: Records 24/7. This provides a complete history but consumes significant storage space.
- Motion-Triggered: Only records when motion is detected. This saves storage and makes reviewing footage easier, focusing on events.
- Pre-Record Buffer: Many Reolink devices offer a pre-record buffer. This means that when motion is detected, the recording will start a few seconds *before* the event, ensuring you don't miss the beginning of an incident.
- Recording Quality and Frame Rate: Adjust these based on your storage capacity and desired clarity. For 2025-26, with higher resolution cameras, you might opt for slightly lower frame rates to conserve space while maintaining good detail.
- SD Card Management: Configure loop recording so that when the SD card is full, it automatically overwrites the oldest footage.
AI Detection (If Supported):
More advanced Reolink models incorporate AI capabilities to differentiate between types of motion.
- Person Detection: This feature significantly reduces false alarms by only alerting you when a human is detected, ignoring pets, cars, or shadows. This is a highly recommended feature for 2025-26 smart homes.
- Vehicle Detection: Some models can also identify vehicles.
Email and FTP Settings:
For advanced users or those wanting off-site backups:
- Email Alerts: Configure the doorbell to send email notifications with a snapshot or short video clip when an event occurs. You'll need to provide SMTP server details for your email provider.
- FTP Upload: Set up the doorbell to upload recordings to an FTP server for secure, off-site storage. This requires an FTP server to be set up and configured.
Integration with Smart Home Platforms:
While Reolink's direct integration capabilities can vary, check for compatibility with platforms like Google Assistant or Amazon Alexa.
- Voice Commands: If compatible, you can link your Reolink account to your smart assistant to view the doorbell feed on smart displays (e.g., "Hey Google, show me the front door").
- Automation: Explore potential automations, such as turning on porch lights when motion is detected by the doorbell.
Network Configuration (DHCP vs. Static IP):
By default, your doorbell will likely obtain an IP address via DHCP from your router. For more stable network management, especially if you have many devices, consider assigning a static IP address.
- Find Current IP: Note the doorbell's current IP address from the Reolink app or your router's DHCP client list.
- Reserve IP Address: In your router's settings, you can often reserve this IP address for the doorbell's MAC address, ensuring it always gets the same IP.
- Static IP on Device (Less Common): Some devices allow setting a static IP directly on the device itself, but this is less common for doorbells and requires careful configuration to avoid IP conflicts.
By investing time in these advanced settings, you ensure your Reolink PoE doorbell is not just a camera, but an intelligent and highly customized component of your home security system, providing peace of mind in 2025-26 and beyond.
Common Issues and Troubleshooting
Even with a robust setup, you might encounter occasional issues. Here's a guide to troubleshooting common problems with your Reolink PoE video doorbell.
1. Doorbell Not Powering On
- Check PoE Connection: Ensure the Ethernet cable is securely plugged into both the doorbell and the PoE switch/injector.
- Verify PoE Port: Try a different port on your PoE switch or injector. Ensure the port is active and providing power.
- Test Ethernet Cable: Use a network cable tester to confirm the Ethernet cable is functional and properly terminated.
- Check PoE Switch/Injector: Ensure your PoE switch or injector is powered on and functioning correctly. If using an injector, check its power adapter.
- Doorbell Fault: If all else fails, the doorbell itself might be faulty. Contact Reolink support.
2. No Network Connection / Offline in App
- Check Ethernet Cable: A loose or damaged Ethernet cable is a common culprit. Reseat both ends.
- Router/Switch Status: Ensure your router and PoE switch are powered on and functioning. Reboot them if necessary.
- IP Address Conflict: If you've assigned a static IP, ensure it doesn't conflict with another device on your network. Revert to DHCP temporarily to test.
- Firewall Issues: Your router's firewall might be blocking the doorbell's communication. Check your router settings.
- Reolink Server Issues: Occasionally, Reolink's servers might be undergoing maintenance. Check their official status page.
- Factory Reset: As a last resort, perform a factory reset on the doorbell (usually by holding a reset button for several seconds). You will need to reconfigure it from scratch.
3. Poor Video Quality (Lagging, Pixelated, Black and White)
- Network Bandwidth: Insufficient upload bandwidth can cause lag and pixelation. Test your internet speed.
- Network Congestion: Too many devices using the network simultaneously can impact performance.
- Ethernet Cable Quality: An old or damaged CAT5 cable might not support the required bandwidth. Upgrade to CAT5e or CAT6.
- Distance from Router: While PoE is stable, extremely long cable runs (over 100 meters/328 feet) can degrade signal quality.
- Low Light: If the video is black and white and you expect color, it's likely due to low light conditions, and the IR night vision has activated. Ensure adequate lighting if color is desired at night.
- Doorbell Overheating: In extreme heat, performance can degrade. Ensure the doorbell is not in direct, prolonged sunlight without ventilation.
4. Motion Detection Not Working or False Alarms
- Sensitivity Settings: Adjust motion detection sensitivity. Lower it if you get too many false alarms, raise it if it's not detecting events.
- Detection Zones: Refine your motion detection zones to exclude areas that cause false triggers (e.g., trees, passing cars).
- AI Detection: If your model supports it, enable Person Detection to filter out non-human motion.
- Schedule: Ensure motion detection is active according to your set schedule.
- Firmware Update: Ensure your doorbell's firmware is up to date, as updates often improve motion detection algorithms.
5. Two-Way Talk Issues (No Sound, One-Way Audio)
- Microphone/Speaker Enabled: Check that the microphone and speaker are enabled in the app settings.
- App Permissions: Ensure the Reolink app has permission to access your phone's microphone.
- Network Latency: High network latency can disrupt real-time audio.
- Doorbell Firmware: Ensure the firmware is updated.
6. Reolink App Issues
- Update App: Make sure you have the latest version of the Reolink app installed.
- Clear Cache: On your mobile device, try clearing the Reolink app's cache.
- Reinstall App: If problems persist, uninstall and reinstall the Reolink app.
For persistent issues, always refer to the official Reolink support website and contact their customer service. Their expertise is invaluable for complex problems, especially with the evolving technology in 2025-26.
Ongoing Maintenance and Updates
To ensure your Reolink PoE video doorbell continues to perform optimally and securely, regular maintenance and timely updates are essential. This proactive approach helps prevent issues and keeps your security system robust.
Firmware Updates: The Cornerstone of Security
Reolink frequently releases firmware updates for its devices. These updates are critical for several reasons:
- Security Patches: As cyber threats evolve, firmware updates often include crucial security patches to protect your device and network from vulnerabilities. In 2025-26, with increased connectivity, this is more important than ever.
- Performance Improvements: Updates can optimize camera performance, improve motion detection accuracy, and enhance overall system stability.
- New Features: Sometimes, firmware updates introduce new functionalities or improve existing ones, adding value to your device.
- Bug Fixes: Updates address known bugs and glitches that may have been present in previous versions.
How to Update:
- Open the Reolink app.
- Navigate to the device settings for your doorbell.
- Look for a "Firmware" or "System" section.
- Tap "Check for Updates."
- If an update is available, follow the on-screen prompts to download and install it. Ensure the doorbell remains powered on and connected to the network during the update process.
Cleaning the Camera Lens and Housing
Over time, dust, dirt, pollen, and water spots can accumulate on the camera lens and the doorbell's housing, affecting video quality and appearance.
- Frequency: Clean the lens and housing periodically, perhaps every 3-6 months, or more often if you live in a dusty or polluted environment.
- Method:
- Use a soft, lint-free microfiber cloth.
- For stubborn dirt, slightly dampen the cloth with water or a lens-cleaning solution specifically designed for camera lenses. Avoid using harsh chemicals or abrasive materials, as they can scratch the lens.
- Gently wipe the lens in a circular motion.
- Clean the housing to maintain its appearance and prevent debris buildup around sensors.
Checking and Managing Storage (SD Card)
If you are using a microSD card for local storage, it's good practice to check its status occasionally.
- Storage Status: In the Reolink app, check the storage status to ensure the SD card is recognized and functioning correctly.
- Formatting: If you encounter errors or notice performance issues, reformatting the SD card (via the app) can sometimes resolve the problem. Note that formatting will erase all data on the card.
- Card Health: MicroSD cards have a limited lifespan. If you experience frequent recording errors or the card becomes unreliable, it may be time to replace it.
Network Health Check
While the PoE connection is generally stable, it's wise to ensure your overall network is healthy.
- Router Performance: Periodically reboot your router and PoE switch to clear temporary glitches and ensure optimal performance.
- Bandwidth Usage: Monitor your network's bandwidth usage, especially if you have multiple streaming devices or heavy internet users. Ensure sufficient upload speed for your doorbell's needs.
Reviewing Settings and Alerts
Periodically review your doorbell's settings, especially motion detection zones and sensitivity. Environmental changes (e.g., new plants, seasonal foliage) might necessitate adjustments to prevent false alarms or missed events.
- Review Logs: Check the event logs in the Reolink app to understand what triggers alerts and if any are being missed.
- Test Alerts: Periodically test your notification settings to ensure they are working correctly.
By incorporating these simple maintenance tasks into your routine, you ensure your Reolink PoE video doorbell remains a reliable and effective part of your home security system throughout its operational life, providing peace of mind in 2025-26 and beyond.
Conclusion: Securing Your Home with Confidence
Setting up your Reolink PoE video doorbell is a significant step towards a more secure and connected home. By following this comprehensive guide, you've navigated the essential stages, from initial planning and physical installation to network connection, software configuration, and advanced optimization. The Power over Ethernet (PoE) technology ensures a stable, reliable connection, delivering clear video footage and consistent performance, which is paramount for effective home surveillance in 2025-26.
Remember the key benefits: enhanced visibility of your doorstep, remote communication with visitors, and the deterrence of potential intruders. By leveraging features like custom motion detection zones, AI person detection (if supported), and scheduled recordings, you can tailor your doorbell's operation to your specific needs, minimizing false alarms and maximizing relevant alerts. Regular maintenance, including firmware updates and lens cleaning, will ensure your Reolink doorbell continues to operate at its best.
Investing in a Reolink PoE video doorbell is an investment in your peace of mind. With its robust features and the reliability of PoE, you are well-equipped to monitor your property effectively and confidently. Embrace the enhanced security and convenience that your new Reolink doorbell brings to your home.